Unity 3D Basics

▶ Documentation and tutorials
- Official documentation: https://docs.unity3d.com/
- Unity Learn tutorials: https://unity3d.com/learn/tutorials/
Table of Contents
The Unity 3D Editor
When you create a project, the scene contains by default a camera (Main Camera) and a light to illuminate the 3D scene (Directional Light). The editor window then looks like this:
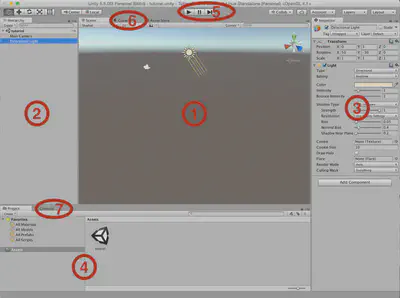
This editor window is composed of the following elements:
- The 3D scene view editor, which lets you directly manipulate objects in the scene.
- The scene hierarchy, which displays the hierarchy of objects present in the scene.
- The inspector, which shows the scripts attached to the selected object (from 1 or 2) and lets you edit their parameters.
- The project browser, which displays the project assets and lets you drag-and-drop them into the scene. For now, the project only contains the scene.
- The buttons to run the scene inside the editor, which is very useful to test and debug the scene (we will later see how to build an executable).
- The game view, i.e., the scene rendered from the virtual camera point of view. The editor automatically switches to this view when you press Play.
- The console, which displays error messages and (logs) during execution.
Interactions in the scene view can be performed using the following toolbar buttons:

See https://docs.unity3d.com/Manual/SceneViewNavigation.html and https://docs.unity3d.com/Manual/PositioningGameObjects.html for more information.
Create a simple scene
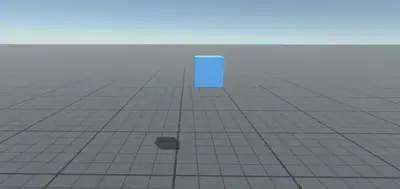
To get started, we will create a very simple application that displays several blue cubes at different positions:
- Insert a plane to create a floor (GameObject > 3D Object > Plane). Using the inspector (3), set the plane coordinates to (0, 0, 0) and check that it is visible from the camera. Scale the plane so that it is 100 meters wide and long, and check that it looks infinite in the camera view.
- Add a cube to the scene (GameObject > 3D Object > Cube) and place it so that it is visible from the camera.
- Create a material to color the cube (Assets > Create > Material). A new asset is created in the project browser (4): give it a name. Then change its color in the inspector to obtain the blue shown in the next image. Finally, drag-and-drop the material from the project browser (4) onto the cube in the scene hierarchy (2). The cube should turn blue in the scene view (1).
- Add a texture on the plane: download the texture
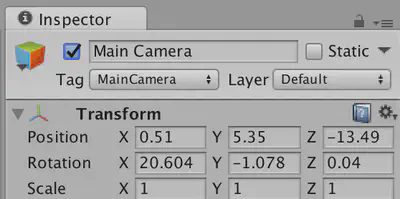
grid_grey.pngfrom the course website, go to (Assets > Import New Asset…) and select the texture. Drag-and-drop it from the project browser (4) onto the plane in the scene hierarchy (2). Then select the plane in the hierarchy (2) and edit the material parameters in the inspector (3) to obtain the same floor texture as in the screenshot below. In particular, you will need to adjust how many times the texture repeats (tiling). - Move the cube and the camera to obtain a similar view when you run the scene:
Add physics to the cube: select the cube and add a Rigidbody (Component > Physics > Rigidbody). Observe what happens when you run the scene.
Drag-and-drop the cube from the scene hierarchy (2) into the project browser (4): this will create a Prefab from the cube (see the blue icon), which you should rename (e.g., CubePrefab). Then, perform the reverse operation to insert 11 additional cubes from this prefab into the scene, and move the instances to obtain the same arrangement as in the image.
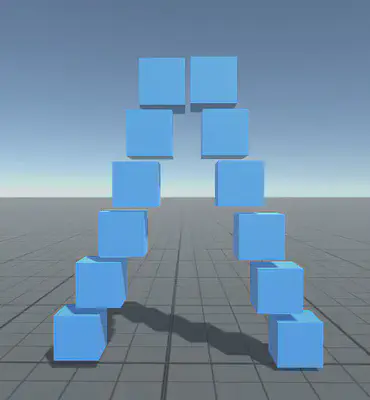
- Run the scene.
- Select the CubePrefab in the project browser (4) and modify its Rigidbody parameters to change its physical behavior (in particular, Mass and Drag). Run the scene with several different values. What do you observe?
Animate a scene object
C# scripts make it possible to define object behaviors. We will now create a C# script to rotate the cubes we created:
- Create a new script (Assets > Create > C# Script) named RotateCube.
- Open it by double-clicking.
- The Update() function, inherited from MonoBehaviour, is called at every time step while the scene runs. In Update(), rotate the object by 3° around the vertical (Y) axis. To do so, you can access the object’s transform through the transform attribute (already defined in the parent class MonoBehaviour). Use auto-completion to inspect the functions available on transform and find the one that performs the appropriate rotation.
- Add the script to the CubePrefab by dragging it onto the prefab icon in the project browser (4). Notice the script appears as a component in the inspector (3): it can be disabled or removed. Also note that all instances of CubePrefab are affected by this change.
- Run the scene.
- To make the script more generic, add a public attribute in the RotateCube class before Start():
public float speed = 3.0f; - Update the script accordingly.
- You should see this attribute appear in the inspector (3), allowing you to change the rotation speed without editing the script each time. Note that 3.0f is the default value when you add the script to a new object.
- Test with different values.
Input and interactions
Unity can capture basic inputs such as keyboard presses or mouse actions. However, to make input handling more generic and avoid hard-coding commands in scripts, Unity provides an Input System. For more information, see: https://docs.unity3d.com/Packages/com.unity.inputsystem@1.4/manual/index.html
We now want to modify the rotation script so that rotation can be toggled on and off. By default, rotation is disabled. When the user presses (and then releases) the “r” key, the cubes start rotating. When they press “r” again, the cubes stop rotating, and so on: every time “r” is pressed, the behavior toggles.
To do so:
- Install and enable the Input System package using the Package Manager.
- Add the package import to your script:
using UnityEngine.InputSystem; - Create a public attribute of type InputAction named activateRotation (other approaches exist: https://docs.unity3d.com/Packages/com.unity.inputsystem@1.0/manual/ActionAssets.html).
- In the inspector (3), configure the action by binding it to a key press:
+ > Add Binding, then set the binding path to Path > Keyboard > By Character Map To Key > R. - To use the action event in your script, first enable it:
activateRotation.Enable();, then connect one of the following callbacks to a function or a lambda:
action.started += ctx => /* Action was started */;
action.performed += ctx => /* Action was performed */;
action.canceled += ctx => /* Action was canceled */;
- To validate your script, print a message to the editor console (7) each time “r” is pressed. You can use:
Debug.Log("your message");.
Simple mouse interaction
We now want to create a new script that (1) pushes cubes when you click on them and (2) changes the cube color when the mouse hovers over it. To do so, we will implement the interfaces IPointerClickHandler, IPointerEnterHandler and IPointerExitHandler from the namespace UnityEngine.EventSystems:
- Add a GameObject > UI > EventSystem to your scene, and click Replace with InputSystemUIInputModule in the inspector (3).
- Add an Event > Physics Raycaster component to your camera. This enables pointer events based on physics raycasts.
- Create a new C# script named MouseInteraction.
- Add the import:
using UnityEngine.EventSystems;. - Implement IPointerClickHandler, IPointerEnterHandler and IPointerExitHandler. The corresponding methods are OnPointerClick, OnPointerEnter and OnPointerExit.
- Create two private attributes of type Rigidbody and Renderer to store references to the object’s Rigidbody (physics) and Renderer (to access the material and change its color).
- In Start(), initialize both attributes using:
GetComponent<Rigidbody>()andGetComponent<Renderer>(). - To push the cube, apply a force to its Rigidbody using
AddForce(...). The attributeCamera.maingives access to the main camera andCamera.main.transform.forwardis the forward direction vector of the camera. You will need to multiply it to obtain a sufficiently strong force. - To change the color, access
.materialon the Renderer and.coloron the material:rend.material.color. This lets you store the initial color (to restore it when the pointer leaves) and set a predefined color such asColor.red.
For more information about MonoBehaviour and its functions, see: https://docs.unity3d.com/ScriptReference/MonoBehaviour.html
Navigation by reusing keyboard/mouse interaction scripts
Unity provides several components to handle common interaction patterns. In this part, we will add a component to navigate the scene like in an FPS:
- Download and import the module “First Person Character Controller” (Window > Asset Store, then search for “Standard Assets - First Person Character Controller”).
- In the project browser, follow:
Assets > Starter Assets > FirstPersonController > Prefabs. Add the prefab named NestedParent_Unpack to the scene hierarchy (2). It comes with its own Main Camera: disable the previously used Main Camera by unchecking it in the inspector (3).
- Change the position of NestedParent_Unpack to obtain a first-person view of the cube stack while standing on the plane.
- Run the scene, test the controls (arrows, space bar, mouse), and also listen to the produced sound.
- If you want to keep using the mouse actions coded previously, you can uncheck Cursor Locked in the inspector (3) for: NestedParent_Unpack > PlayerCapsule > Starter Assets Inputs. You will also need to add a Physics Raycaster to the new camera.
Dynamic object creation
We now want to create objects dynamically in the 3D scene. Unity provides the function Instantiate(GameObject obj) to create a runtime copy of an object. The object passed as a parameter can be an object already in the scene, or a Prefab if you do not want the object to already exist in the scene.
We want yellow cubes to be launched in the direction of the camera when the user right-clicks:
Create a new C# script named CreateOnClick.
Add this script to NestedParent_Unpack > PlayerCapsule > PlayerCameraRoot (the object that follows mouse motion). This object also carries the camera.
Create a public attribute
GameObject aCopierto store a reference to the object to instantiate. Initialize it by dragging CubePrefab into the field in the inspector (3) while PlayerCameraRoot is selected.Right-click can be handled like a key press (similarly to “ActivateRotation”).
On each right-click:
- Instantiate a new cube with
Instantiate(GameObject obj); - Change its color;
- Place it in front of PlayerCapsule, otherwise it may be ejected in an unexpected direction due to collision with PlayerCapsule;
- Apply a force to launch it forward.
- Instantiate a new cube with
Note that you can also remove objects from the scene with Destroy(GameObject obj).
Load a mesh
We now want to load a 3D car model with textures:
- Download the archive
Ford_Mondeo.zipfrom the course website. Unzip it. It contains an .obj file describing the mesh, an .mtl file describing colors and texture placement, and .tga texture images. - Drag-and-drop the whole folder containing the model files into the project browser (4). The model should be imported into Unity.
- Drag-and-drop the model into the scene hierarchy (2) to add it to the scene. Adjust its scale to match the cubes, and position it near the cube stack.
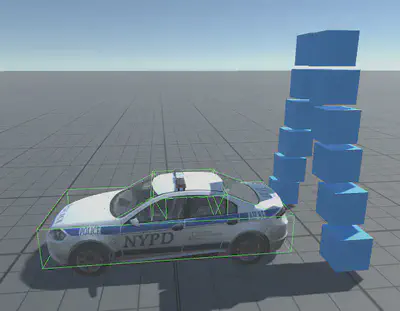
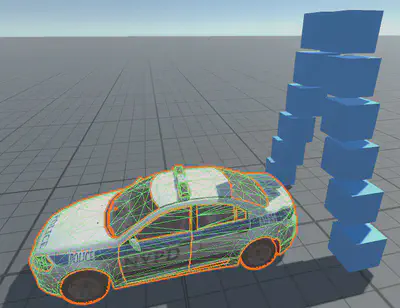
- Importing 3D models often comes with small compatibility issues across 3D libraries. Observe that here, the transparency of the car windows has not been preserved. Find the material corresponding to the windows and change its Rendering Mode, as well as the alpha (A) component of the Main Maps color, to make the windows transparent.
- Try throwing cubes at the car, or walking through it. What do you observe? Why?
- Find a solution to fix this. You may use Box Colliders that you place manually, or Mesh Colliders added to the appropriate car parts (see screenshots on the next page). The second solution is more accurate but more expensive computationally.
Build an executable
Finally, we want to build an executable for this scene so that it can be run full-screen and potentially distributed:
- Go to File > Build Settings….
- Select the target PC, Mac & Linux Standalone. Note that other interesting targets exist, such as WebGL (see the tutorial executable on the course website).
- Click Build.
- Test your executable.
You can then click Player Settings… at the bottom of the Build Settings… window and explore player parameters (startup dialog, resolution, etc.).
Going further
Explore Assets, GameObjects, Components, and the documentation to add properties or animations to your scene (e.g., particles, collisions…).
In particular, you can load the Vehicles package, test it, and try to understand how the different vehicles work.
The following topics go beyond a basic “Unity introduction”, but they remain accessible if you carefully read the suggested links:
- Change the skybox and other rendering settings (Window > Rendering > Lighting Settings).
- Modify rendering using shaders and custom textures (see the shader lecture).
- Mark objects that do not move as static (https://docs.unity3d.com/Manual/StaticObjects.html) or bake lights (https://docs.unity3d.com/Manual/LightMode-Baked.html) to optimize performance.
- Add particles (https://docs.unity3d.com/Manual/class-ParticleSystem.html) (fire, water, fog, etc.). Examples can be found on the Asset Store.
- Use layers (https://docs.unity3d.com/Manual/Layers.html) to change rendering and lighting effects on specific elements.
- Add animations (see Animations & Animators: https://docs.unity3d.com/Manual/animeditor-UsingAnimationEditor.html).
- Use avatars (https://docs.unity3d.com/2017.1/Documentation/Manual/class-Avatar.html).
- Learn about Inverse Kinematics (https://docs.unity3d.com/Manual/InverseKinematics.html).
- Use coroutines (https://learn.unity.com/tutorial/coroutines) to manage longer time-based events.
- Create a user interface (https://docs.unity3d.com/Manual/UISystem.html).
- Use a custom controller.
- Make your code safer using SerializeField or RequiredComponent.
Resources
Documentation
Textures
Skyboxes
3D models
Avatars
Useful assets