Projective Augmented Reality — Tutorial
Hands-on tutorial on projective augmented reality using camera-projector calibration and OpenCV.
Projective Augmented Reality
Objectives
This tutorial introduces the fundamentals of projective augmented reality (AR), from camera-based event detection to spatial augmentation using a projector.
The reference application is a tic-tac-toe game, but the architecture can be reused for any surface augmentation scenario (e.g., augmented board games, scientific visualization, research experiments).
You will learn how to:
- Calibrate camera, projector, and physical surface
- Compute transition (homography) matrices between spaces
- Detect surface modifications
- Project consistent augmentations in real time
System Overview
We work in three different spaces:
- Camera image space
- Projector image space
- Physical board space
These spaces are not aligned. Calibration is required to compute the transformations between them.
The main goal is:
- Convert a detected move (camera space) into board coordinates
- Convert a board coordinate into projector coordinates
Installation
Make sure Python and pip are installed.
The tutorial has been tested with Python 3.12 and 3.13. Other versions may work, but adjustments might be necessary.
Install required dependencies:
pip install numpy==1.26.4
pip install opencv-python==4.10.0.84
pip install opencv-contrib-python==4.6.0.66
- OpenCV: Computer vision library
- Aruco: Marker generation and detection module (included in opencv-contrib)
Documentation: https://docs.opencv.org/4.x/index.html
Marker Generation
Run:
python generateMarkers.py
If correctly installed, four markers defining the playing area will be generated.
Print and place them on the board.
Coordinate Conventions
Matrix Representation (Images)
Images are NumPy matrices in row-major order:
- First index → row (vertical, downward)
- Second index → column (horizontal, rightward)
- (0,0) is top-left
Point Representation
Points follow image convention:
- Origin: top-left
- X → right
- Y → down
Coordinate system:
(0,0) - X →
   |
   |
   Y
   ↓
Be extremely careful when switching between matrix indexing and geometric coordinates.
Code Structure
Four main components:
CameraProjectorCoreARTicTacToe
All missing parts are marked with:
### TODO
1️⃣ Initialization
Camera
- Automatically searches for available camera
- Exposure configurable
- Must release using:
camera.release()
Complete all TODO sections.
Projector
Constructor: no modification required.
Implement:
drawBlack()
Understand how drawing works in projector space.
CoreAR
Constructor only stores references.
No modification required.
2️⃣ Calibration
Camera Calibration
Goal:
- Detect the four ArUco markers
- Match detected corners with board coordinates
- Compute homography between board and camera
Complete all TODO sections in:
calibrateCamera()
Projector Calibration
Principle:
- Project markers at known projector positions
- Detect them with camera
- Convert camera detections to board coordinates
- Compute projector → board homography
Complete:
drawMarkers()in projectorcalibrateProjector()in CoreAR
3️⃣ Drawing in Projector Space
Implement:
draw()checkCalibration()
This allows:
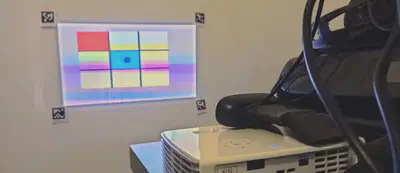
- Displaying the game board
- Validating calibration visually
Test full calibration pipeline.
4️⃣ Game Logic
The ticTacToe class is already implemented.
You now focus on detecting moves.
5️⃣ Move Detection
Strategy:
- Capture reference frame
- Compare current frame with reference
- Compute difference image
- Apply threshold
- Apply morphological opening
- Extract blob position
- Validate stability over time
- Update reference frame
Complete all TODO sections in:
findMove()
Intermediate imshow() lines can be uncommented to debug.
Image Processing Pipeline
- Frame subtraction
- Thresholding
- Morphological opening
- Contour extraction
This isolates new moves placed on the board.
Improvements & Tuning
You may adjust:
- Camera exposure
- Projector brightness
- Threshold value
Fine-tuning greatly impacts detection robustness.
What You Have Built
At the end of this tutorial, you have implemented:
- Camera-projector calibration
- Multi-space homography estimation
- Real-time surface augmentation
- Basic event detection
This architecture can be reused for:
- Augmented board games
- Interactive surfaces
- Experimental setups
- Scientific visualization
Deliverables
- Completed code (all TODOs filled)
- Functional calibration
- Fully working augmented tic-tac-toe
Optional:
- Detection improvements
- Graphical enhancements
- Additional gameplay features
Clarifications (Based on Student Questions)
OpenCV Installation with Conda
If pip is not available, use:
conda install -c conda-forge opencv
In most cases, Aruco is installed automatically with this command.
If not, try:
conda install -c conda-forge aruco
If ArUco is still missing, you may need to install pip and use the opencv-contrib-python package.
Camera → Projector Projection Matrix (R2P)
The projection matrix from the real board to the projector space (R2P) is:
- Computed inside
CoreAR - Assigned in
main.pyvia:
proj.R2P = core.R2P
There is no encapsulation mechanism here. The attribute is dynamically added to the Projector instance.
Inside the Projector class, you simply use:
self.R2P
This works because draw() is only called after the attribute has been defined.
Calibration Functions and Transition Matrices
calibrateCamera()
- Detects physical ArUco markers placed on the board
- ⚠ Do not place markers on a black background
- Computes the transformation matrix:
R2C (Real → Camera)
calibrateProjector()
The projector displays virtual markers
The camera detects those projected markers
Matching is performed between:
- Known projected marker positions
- Detected marker positions in camera space
A Camera → Projector transformation is computed
From this, we deduce:
R2P (Real → Projector)
So the full transformation chain is:
Real → Camera → Projector
And finally:
R2P = (C2P) ∘ (R2C)
End of tutorial.