Lab — Unity 3D basics
Build a first interactive scene with objects, physics, scripts and a standalone build.

- Duration
- 2–3 hours
- Environment
- Unity 6.3 LTS · URP
- Level
- Unity beginner
A first introduction to Unity for students familiar with computing who have never used the engine. You will build a cube scene, add physics and interactions, navigate in first person, launch objects, import a car and build an executable.
Unity 6.3 LTS (6000.3) must be installed. Project creation, package installation and resource imports take place during the session. Completion time will depend on your C# experience.
Brest campus only School PC configuration
Definitions throughout the lab
Terms with a dotted underline have a definition: hover over or click them. You can also reach them with Tab and use Enter or Space; Escape closes the tooltip.
Lab outline
Prepare the project
- In Unity HubApplication for creating and opening Unity projects and managing installed editor versions.
, select 6.3 LTS and create a Universal 3D (URPUniversal Render Pipeline: Unity’s rendering system for turning a scene into images. Materials must use URP-compatible shaders.
) project. Use the same
6000.3.xf1patch throughout the session. The MaterialAn asset describing a surface’s appearance by combining a shader with parameters such as color and textures. and controller used here target URP. - AssetA resource stored in the project: a scene, script, texture, material, model or prefab. Multiple objects can use it. are your project resources: scenes, ScriptA C# project file. A script derived from MonoBehaviour can be attached to a GameObject as a component.
, materials, TextureAn image used by a material to add surface detail, such as color or apparent relief. A texture alone does not define the complete appearance.
, 3D modelAn imported resource containing geometry and possibly materials, a hierarchy or animations.
and PrefabA reusable GameObject template asset with components and children. Instances inherit template changes unless settings are locally overridden.
. They are stored in the Assets folder shown in the ProjectEditor window showing project files and assets. Unlike Hierarchy, it does not list just the objects in the scene. window. Organize them by creating
Scenes,Materials,Textures,PrefabsandScriptsthrough right-click in Assets > Create > Folder; reuseScenesif it already exists. In Project, find the open scene (usuallySampleScene), rename it UnityBasics using Rename (or F2), and move it intoAssets/Scenesif needed. Save the scene with Ctrl+S. - Open Window > Package Management > Package ManagerWindow for finding, installing and managing packages and importing assets from your account.
. In Unity RegistryUnity’s package catalog, available through the Package Manager.
, search for Input SystemPackage that receives keyboard, mouse or gamepad input and maps it to application actions. (
com.unity.inputsystem) and click Install if it is not installed. The version used when testing this lab is 1.20.0. Under Edit > Project Settings > Player > Other Settings > Configuration > Active Input HandlingProject setting selecting enabled input systems: Input System, the legacy Input Manager or both. , select Input System Package (New) only if it is not already selected, then accept the requested restart. Under In Project in the Package Manager, check that Unity UI / uGUIUnity’s GameObject-based UI system. It also provides the EventSystem and pointer event interfaces used here. (com.unity.ugui) is installed: it provides the EventSystemComponent that distributes interaction events to the relevant objects using an input module and raycasters. , Physics RaycasterCamera component identifying 3D colliders under the pointer and providing these results to the EventSystem. and click/hover interfaces used later. If missing, find it in Unity Registry and install it. - Add the official first/third person controller to your account and import it through My Assets in the Package Manager. Accept installation of its dependencies when prompted, then return to
UnityBasics. - Download and extract the lab resources (
resources-unity63.zip). From your file explorer, draggrid_grey.pngintoAssets/Texturesin Project. The archive also containsFord_Mondeo.zip: extract it to obtain theFord_Mondeofolder, containingcar.obj,car.mtland.tgatextures. Keep this folder for Load a MeshAn object’s 3D geometry, described by vertices and faces. The visible mesh and collision shape may differ. , where you will import it into Unity as a whole.
The Unity 3D Editor
A TemplateA starting template that creates a project with preconfigured packages and settings. scene generally contains CameraAn object with a Camera component that renders a scene view. Navigating Scene differs from viewing through the game camera. , Directional LightA light shining in a uniform direction, like a distant sun. and possibly a Global VolumeAn object applying rendering settings, including post-processing effects, globally according to its configuration. for URP rendering. Window layouts can vary.
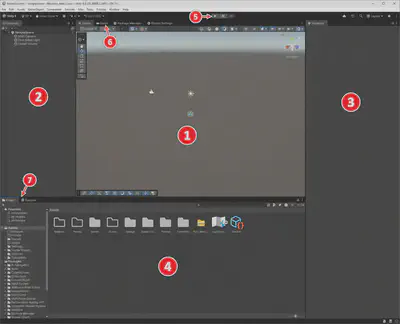
Unity 6.3 LTS screenshot. Labels 6 and 7 point to the GameWindow displaying the game cameras’ output and allowing application interactions to be tested. and ConsoleWindow displaying logs, warnings and errors, including C# compilation errors. tabs; click them to display their contents.
| Number | Window | Purpose |
|---|---|---|
| 1 | SceneWorking view for inspecting and editing the scene independently of the game camera. | Navigate and manipulate scene objects. |
| 2 | HierarchyWindow listing scene GameObjects and their parent/child relationships. | View GameObjectThe basic scene object. Components give it functions such as rendering, physics, lighting or scripted behavior. and their parent/child relationships. |
| 3 | InspectorWindow displaying and editing the selected object’s components or an asset’s import settings. | View and edit all ComponentAn element attached to a GameObject that adds a property or behavior. One object can have several components. , including scripts. |
| 4 | Project | View assets: scenes, textures, materials, prefabs, scripts… |
| 5 | Play modeMode for running the application inside the editor. Scene changes made during execution are normally lost on stopping. / Pause / Step | Run, pause and advance execution one frame at a time. |
| 6 | Game | View the camera’s rendered output. |
| 7 | Console | Read messages, warnings and errors. |
Fundamental concepts
Before manipulating objects, take a moment to understand the relationships between project resources, scene objects and their components. The following boxes provide reference points for the session.
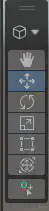
Select an object and press F in Scene to frame it. Use Move, Rotate and Scale (W, E, R, outside text fields). Hold the right mouse button to look around Scene; movement keys then let you navigate. Local / GlobalLocal uses the object’s axes; Global uses world axes. A child’s coordinates can also be expressed relative to its parent. selects the manipulation coordinate system. See navigation and positioning.
Create a simple scene
We will create a floor and a stack of twelve blue cubes.
Add GameObject > 3D Object > Plane, named
Ground, with position(0, 0, 0), rotation(0, 0, 0)and scale(10, 1, 10). A plane is 10 × 10 units at scale 1, giving 100 × 100 units here. One unit represents approximately one meter; the plane is finite.Add a cube
Cube, with scale(1, 1, 1)and position(0, 3, 0).Create
CubeBlueinAssets/Materials(Assets > Create > Material). Select the ShaderProgram calculating a surface’s appearance. A material selects the shader and supplies its parameters and textures. URP LitURP’s standard shader for lit materials, using color, textures and surface properties. and a blue Base MapThe base texture and color of a URP Lit material, combined to determine its surface color. color. Drag the material onto the cube.Create
GroundGrid, also using URP Lit, and draggrid_grey.pnginto its Base Map. Assign this material to the plane. Click thegrid_grey.pngtexture in the Project window: its import settings appear in the Inspector. Check that Wrap ModeTexture setting determining what happens outside its normal coordinates. Repeat tiles the image. = Repeat; this is normally already selected. If you change it, click Apply. Try material TilingMaterial parameter controlling how often the texture repeats across a surface. = (100, 100) and adjust it. A material describes appearance; a texture is an image used by a material.Place the camera, for example at
(8, 6, -12)with rotation(20, -30, 0). Adjust the framing in Game to see the floor and cube. Keep its MainCamera TagA label assigned to a GameObject for identification in scripts. For example, Camera.main finds an active camera tagged MainCamera. .
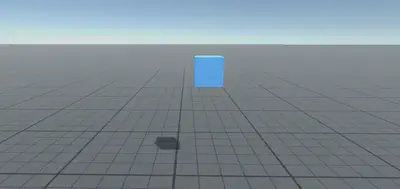
Add a RigidbodyComponent allowing the physics engine to simulate an object’s motion, gravity, forces and collisions. to the cube using Add Component. Keep Use GravityRigidbody option enabling gravity on that body. enabled and Is KinematicWhen enabled, the Rigidbody is controlled by code or animation rather than simulation forces. disabled. The cube already has a Box ColliderA box-shaped collider, providing a simple and inexpensive approximation of a cube or object part. ; the plane also has a ColliderComponent defining a collision shape. It can detect contact without rendering geometry. . Run the scene: the cube falls and stays on the floor. The RendererComponent rendering geometry and using materials to determine its appearance. displays the object, the Collider defines its collision shape and the Rigidbody enables physics simulation.
Stop Play. Drag the cube from Hierarchy into
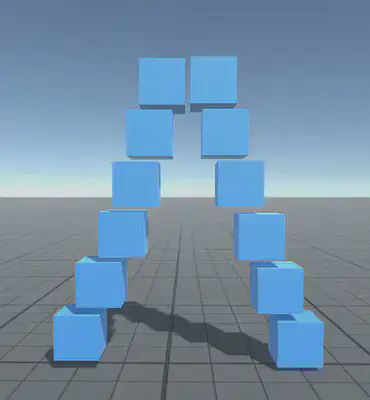
Assets/Prefabsand name the assetCubePrefab. Create twelve instances in two columns of six cubes that converge toward the top, as shown below. Keep scale(1, 1, 1), rotation(0, 0, 0)and Z0for every cube.
Tip — when working with many objects: duplication with Ctrl+D (Cmd+D on macOS), multiple selection and Inspector numeric expressions such as L(a,b) for distributing objects evenly can save time. For this lab’s twelve cubes, simply position the instances to reproduce the shape shown below.
- Test the stack. Double-click
CubePrefaband change MassRigidbody mass, affecting response to forces and impulses without making free fall faster by itself. , then Linear DampingDamping that gradually reduces Rigidbody linear velocity, distinct from contact friction. . Angular DampingDamping that gradually reduces Rigidbody angular velocity. slows rotation. Compare the instances, then restore Mass to1and Linear Damping to0.
Observe: without damping, a larger mass does not make an object fall faster. It changes the response to the same impulse, which you will test later. Contact friction is configured through a Physics MaterialAsset defining collider friction and bounce. It does not define the object’s visible color. on the Collider and differs from damping. Values changed only on an instance may be Prefab overrideA prefab-instance change overriding a setting inherited from the template. : inspect them if a prefab change does not propagate.
Animate a scene object
A C# script derived from MonoBehaviourBase class for scripts attachable to GameObjects. Unity calls lifecycle methods such as Update. becomes a component. We will create a script that simply rotates the cubes.
Write RotateCube
- In
Assets/Scripts, create Assets > Create > Scripting > MonoBehaviour Script, namedRotateCube. Open it in your C# editor; the class name must match the file.
- Declare
speedas a field of theRotateCubeclass. Place this declaration inside the class braces, but outside methods such asStart()andUpdate(). This field stores the component’s rotation speed; it is not a method-local variable. The SerializeFieldC# attribute allowing Unity to save a private field and expose it in the Inspector. annotation exposes it in the Inspector.
[SerializeField] private float speed = 90f; // degrees per second
- In UpdateMonoBehaviour method called once per frame while the component is active. , called once per frame, use:
transform.Rotate(Vector3.up, speed * Time.deltaTime, Space.Self);
Time.deltaTimeDuration of the previous frame in seconds. Multiplying speed by it gives the movement or rotation for the current frame. is the elapsed time since the previous frame, making the speed independent of the frame rate. Rotating by 3° per frame would produce different speeds on different machines.
- Test on one cube. Select an instance in Hierarchy. Drag
RotateCube.csfrom Project onto this cube or into its Inspector; alternatively, click Add Component, search for RotateCube and select it. Check that the component appears in the Inspector. Enter Play: only this cube rotates, becausetransformrefers to the GameObject the script is attached to. - Extend the behavior to the other cubes. Stop Play. Adding the component to this instance is an override. In Overrides, at the top of its Inspector, select the added RotateCube component and use Apply to apply it to the prefab. The
CubePrefabtemplate now contains this component and other instances inherit it. Enter Play to see all cubes rotate. - Alternatively, edit the template directly. Open
CubePrefabfrom Project and attach RotateCube using the same drag-and-drop or Add Component. To rotate only a few cubes, attach the script to the chosen instances without applying it to the prefab. Add it only once per cube, so two RotateCube components do not combine their rotations. - Test several speeds in the Inspector. Then, outside Play mode, temporarily replace the declaration with
public float speed = 90f;, followed byprivate float speed = 90f;. Save and let Unity compile each time: does Speed still appear in the Inspector? Finish by restoring[SerializeField] private float speed = 90f;.
Check: the cubes rotate and speed is adjustable in the Inspector without editing code.
Input and interactions
Extend Assets/Scripts/RotateCube.cs so the cube starts stationary and each R press starts or stops its rotation.
- Import Input System. Add
using UnityEngine.InputSystem;at the top of the file, keepingusing UnityEngine;. - Declare the action. Inside the class, alongside
speedand outside methods, add a privateactivateRotationfield of type Input ActionA logical action such as jumping or rotating, bound to input controls. It can be read or trigger callbacks. , exposed with[SerializeField]. Initialize it withnew InputAction(...)and these three arguments in order: the name"ActivateRotation", the typeInputActionType.Buttonand the BindingMapping between an action and a control, such as the R key or right mouse button."<Keyboard>/r". - Store the rotation state. Add a private
rotatingfield of typebool, initialized tofalse. It indicates whether the cube should rotate; it does not need to appear in the Inspector. Keep the existingspeedfield. - Write the toggle method. Add a private
ToggleRotationmethod that returnsvoidand takes anInputAction.CallbackContext contextparameter. In its body, assignrotatingthe opposite of its current value using the!operator:falsebecomestrue, and vice versa. Input System suppliescontext; you do not need to use it here. - Subscribe in
Start(). SubscribeToggleRotationto theperformedevent ofactivateRotationusing+=, writing the method name without parentheses. This subscription specifies which method to call when the action triggers.
- Enable the action in
Start(). After subscribing, callEnable()onactivateRotation. This second statement allows the action to receive input: subscribing alone is not enough. - Make rotation conditional in
Update(). Keep the previous exercise’stransform.Rotate(...)statement, but place it inside anifthat checksrotating. The cube then rotates only when this boolean istrue. - Check in Unity. Save, wait for compilation and inspect the RotateCube component: its action should be Button, bound to R. These settings are the initial values provided by the code. As with Speed, you can edit them in the Inspector; editing a prefab instance creates an override. For this test, keep R and the default press behavior.
Check: enter Play and click inside Game. Cubes start stationary; pressing R makes them rotate, releasing R changes nothing, and pressing again stops them.
Simple mouse interaction
We will make each cube red while the mouse hovers over it, restore its original color when the mouse moves away, and push it with a left click.
To detect these interactions, we will add an EventSystem to the scene and a Physics Raycaster to the camera. The former dispatches mouse events; the latter identifies the object under the pointer using its colliders. Our MouseInteraction script will then receive these events through three methods: OnPointerEnter when hovering begins, OnPointerExit when it ends, and OnPointerClick for clicks.
- Add GameObject > UI > Event System if missing. Keep one active EventSystem. It must use Input System UI Input ModuleModule translating Input System actions into events distributed by the EventSystem. : replace Standalone Input Module if present. Use Assign Default Actions if UI action references are empty.
- Add Physics Raycaster through Add Component on the active camera tagged MainCamera. Cubes must have colliders and belong to a LayerA GameObject category used to filter rendering, collisions and raycasts. A mask selects multiple layers. included in the raycaster mask.
- Create a new
MouseInteraction.csscript inAssets/Scriptsand complete it in the following steps. ImportUnityEngine.EventSystemsand implement the three interfacesIPointerClickHandler,IPointerEnterHandlerandIPointerExitHandler. DefineOnPointerClick,OnPointerEnterandOnPointerExit, each public, returningvoidand takingPointerEventData eventData.
- Prepare the component. Initially leave the three interaction methods empty, save and check that the script compiles. Add MouseInteraction to
CubePrefabso every cube has this behavior. All changes below belong inMouseInteraction.cs. Nothing is needed inUpdate(): the interaction methods will be called on mouse events. - Remember the starting color. Declare a private
initialColorfield of typeColorinside the class, outside methods. InStart(), obtain the cube’s Renderer usinggameObject.followed by GetComponentMethod finding a component of the requested type on the same GameObject. GetComponentInChildren also searches its children.<Renderer>(). Then access itsmaterial.colorproperty and store that color ininitialColor. Each cube therefore remembers its own color at startup. - Turn the cube red on hover. In
OnPointerEnter, obtain the Renderer in the same way and assignColor.redto itsmaterial.colorproperty. Test: save, enter Play and hover over a cube in Game: only that cube should turn red. - Restore the color on exit. In
OnPointerExit, assigninitialColorto the samematerial.colorproperty instead. Test: move the mouse away from the cube: it should return to its starting color. Usematerial, which lets you change this cube’s appearance individually. - Push the cube on left click. In
OnPointerClick, add anifcomparingeventData.buttontoPointerEventData.InputButton.Left. Inside it, obtain the Rigidbody withgameObject.GetComponent<Rigidbody>(), then call itsAddForcemethod with two arguments: the direction Camera.mainReference to an active camera tagged MainCamera, distinct from a Cinemachine tracking target..transform.forwardmultiplied by5f, and ForceMode.ImpulseMode applying an instantaneous push to a Rigidbody, with an effect depending on its mass. for a single push. Test: left click pushes the cube in the camera’s viewing direction; right click does not push it.
Check: only the hovered cube turns red; left click pushes it, right click does not. MonoBehaviour lifecycle.
Navigation by reusing keyboard/mouse interaction scripts
Integrate a first person controller into your scene using the official First Person + Third Person | Character Controllers package. It provides the scripts needed to move the character with the keyboard and look around with the mouse.
- After importing through Package Manager > My Assets, open
Assets/Starter Assets/Sample/FirstPersonController/Playground.unityin Project, the first person demonstration scene, and test it. Inspect movement, jump, sprint and look bindings in its Input Actions asset: keys depend on its configuration and your keyboard. - Identify the character with CharacterControllerScript-driven character movement component with a capsule shape and collision handling, rather than Rigidbody force simulation.
, the rendering camera with Camera / AudioListenerComponent representing the scene’s audio listening position, usually on the active camera.
/ CinemachinePackage controlling camera tracking, framing and transitions. The Unity camera still produces the image.
, and the Cinemachine Camera controlling tracking. A tracking target such as
PlayerCameraRootis a Transform; it is not necessarily the rendering camera. - In Hierarchy, select MainCamera, PlayerFollowCamera, PlayerCapsule, UI_EventSystem and UI_TouchScreenInput together, as outlined in the screenshot below, and copy them. Open
UnityBasics, the lab’s scene, then paste them. Copy these objects together to preserve the first person Camera/character rigA connected set of objects and components handling character movement and camera tracking. references.
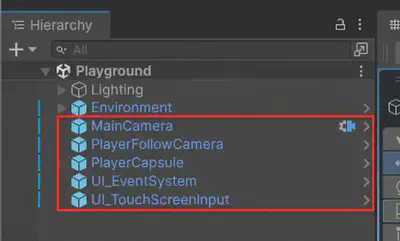
- Remove duplicates after pasting. Disable the GameObject of
UnityBasics’ original fixed camera and keep the copied MainCamera. Delete the EventSystem created in the previous section and keep the copied UI_EventSystem. There must be one active EventSystem, one active rendering camera tagged MainCamera and one active AudioListener. Also keep PlayerFollowCamera, which controls the rendering camera through Cinemachine. Place the character near the stack, for example X0, Z-8, with its bottom just above the floor. - Test navigation and notice what changed. Check that the controller’s ground mask includes the
Groundlayer. Enter Play and click inside Game: test movement, look, jump and sprint. The character works, but red hover and cube clicks no longer work as before: the cursor is locked and the new camera does not yet have a raycaster. If the controller produces footstep or jump sounds, identify them too. - Restore interactions at the screen center. Stop Play. Add Physics Raycaster to the copied MainCamera. Select UI_EventSystem and, in its Input System UI Input Module component, expand Advanced and set Cursor Lock Behavior = Screen Center. Enter Play again with the cursor locked and mouse look enabled: the cube aimed at in the screen center turns red, and left click pushes it. Physics Raycaster now detects the object ahead of you at the image center.
- Restore a free mouse pointer. Stop Play. On PlayerCapsule, in the controller’s input component (Starter Assets Inputs), uncheck Cursor Locked and Cursor Input For Look. Enter Play again: the mouse is visible, moving it no longer turns your head, and you can hover over and click cubes with the pointer, as in the previous section. Screen Center only forces the screen center when the cursor is locked.
Cursor Lock Behavior configuration.
Dynamic object creation
Instantiate copies a GameObject or a component and its object. Prefabs allow object creation without a hidden template in the scene. We will launch yellow cubes forward on right click.
- Create a
Projectilecube, sized(0.25, 0.25, 0.25), with a yellow URP Lit material, Box Collider and Rigidbody, mass1, gravity enabled and Is Kinematic disabled. Turn it intoProjectilePrefaband remove its scene instance. It has neitherRotateCubenorMouseInteraction, to avoid copying the targets’ actions and behaviors. - In
Assets/Scripts, create a newCreateOnClick.csscript and attach it to the camera that actually has Camera, rather than the Cinemachine target. Complete this script in the following steps. Declare[SerializeField] private Rigidbody projectilePrefab;and dragProjectilePrefabinto that field: this reference provides direct physics access. - Import
UnityEngine.InputSystemand declare a Button InputAction namedfire, bound to<Mouse>/rightButton. Enable it inStart()as before. Here, instead of subscribing toperformed, query the action inUpdate()withfire.WasPressedThisFrame(): this method returnstrueonly for the frame in which the button has just been pressed. - Calculate the starting position. In
Update(), put the following operations inside anifchecking the press detected in step 3. Declare a localVector3variable namedposition: start from the camera’s position (transform.position) and add its forward direction (transform.forward) multiplied by2f. The projectile will appear two units in front of it. - Create the projectile. Call InstantiateUnity function creating a new instance of an object or prefab at runtime. with three arguments:
projectilePrefab, the calculated position and the camera’s rotation (transform.rotation). Store the result in a localRigidbodyvariable namedprojectileso you can act on this new instance. - Launch the projectile. As with pushing the cubes, call
AddForceon the newly created Rigidbody. Use the camera’s forward direction multiplied by12f, withForceMode.Impulse. - Remove the projectile after a delay. Call
Destroywith the instance’s GameObject (projectile.gameObject) and a delay of8fseconds. Keep this call inside the sameif: each projectile will have its own lifetime.
Yellow comes from the prefab material; you can also change the instance renderer’s color. Spawning in front of the player avoids creating it inside the character. Also check for free space in front of the camera: two units do not guarantee avoiding a nearby wall.
Observe: compare trajectories and pushes by changing mass and impulse. An impulse is applied once; a continuous force would be applied at the simulation rate in FixedUpdateMethod called at the fixed physics simulation rate, independently of the display frame rate.
. Destroy removes the object, here after eight seconds. Instantiate, AddForce.
Load a mesh
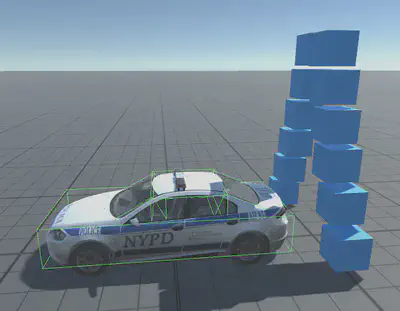
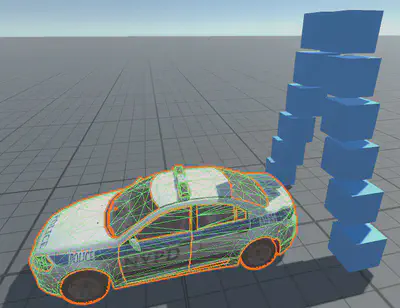
Import the Ford Mondeo, make its windows transparent and define its collisions.
- Unzip
Ford_Mondeo.zipfrom the lab resources. Thecar.objfile contains the car’s mesh and the.tgafiles are its textures. - In Project, create
Assets/Models(right-click in Assets > Create > Folder). From your file explorer, drag the entire extractedFord_Mondeofolder intoAssets/Modelsin Project. Wait for the import to finish, then dragcar.objfrom Project into Hierarchy to create a scene instance. Select this instance and set Transform > Scale to(0.01, 0.01, 0.01)as a starting point. Check its size against the one-meter cubes, then adjust its size, rotation and position if necessary. Base Map textures should already be assigned. - Extract the materials to edit them. Select the
car.objasset in Project, then open the Materials tab of its Import Settings in the Inspector. Materials are included in the model: click Extract Materials… and choose a folder, such asAssets/Materials/Car. They become material assets you can edit. - Make the windows transparent. Identify the material used by the windows and select the extracted material in Project. In its Inspector, using the Universal Render Pipeline/Lit shader, set Surface Type = Transparent and Blending Mode = Alpha. Open the Base Map color and reduce its AlphaOpacity component: 0 means transparent and 1 opaque. The shader must also be configured for transparency. value, for example to
0.3. Observe the window transparency in the scene. - Launch cubes at the car and try walking through it. A visible mesh does not automatically provide a collider. Add Box Colliders for a simple approximation or Mesh ColliderCollider using a mesh as its collision shape. Non-convex shapes suit static scenery; dynamic bodies require other choices. on suitable parts of the stationary car.
A non-Convex colliderCollision shape without concavities. Unity restricts dynamic-body Mesh Colliders; a convex approximation is one possible option. Mesh Collider suits StaticFlags telling Unity systems that an object will not move, enabling relevant optimizations or precomputation. scenery without a dynamic Rigidbody. For a moving physical car, prefer compound primitive colliders or convex Mesh Colliders with a Rigidbody on the root. More detailed collisions can cost more computation. Mesh Colliders, URP Lit.
Check: plausible scale, visible textures, transparent windows and collisions with the character and projectiles.
Build an executable
- Stop Play and save
UnityBasics. - Open File > Build ProfilesBuild configurations grouping a target platform and application build settings. . Choose Linux, Windows or macOS for your machine and create/activate its profile if needed. The corresponding build module must be installed through Unity Hub.
- In Scene ListList of scenes included in a build; the first enabled scene is normally loaded at startup. , add the scene using Add Open Scenes. Check that it is enabled and first; remove demonstration scenes. A profile can override the shared list: check the list actually used.
- Click BuildApplication produced from the project for a target platform, able to run without the Unity editor.
, choose a dedicated folder outside
Assets, such asBuilds/Linux, then run the application. Build And Run runs it immediately. - Test navigation, R, clicks, physics and materials outside the editor. Distribute the whole build folder. Explore Player SettingsSettings for the exported application, including its name, resolution and platform options. > Resolution and Presentation for resolution and fullscreen behavior.
The Web platform also supports a browser build with its module. It requires an HTTP server: directly opening the HTML file is insufficient. Start with a local build in this session. Build Profiles.
Going further
Choose one direction to extend the scene you have just built. The variations suggested throughout the lab — holding R, pushing while pressed and switching mouse modes — are a good first step.
- Customize shooting. Expose projectile impulse, lifetime and spawn distance in the Inspector with
[SerializeField]. Compare settings without changing the code. - Build a small course. Reuse your prefabs to place obstacles and targets. Use layers to choose which objects can collide or be targeted.
- Give the scene an atmosphere. Change the SkyboxBackground representing the scene’s distant environment, often the sky. and lighting in Window > Rendering > Lighting. To go further, study Static objects and Baked lightingLighting calculated in advance and stored in resources rather than fully recalculated at runtime. : do not mark moving cubes as static. Baked lighting.
- Add a visual effect. Create smoke with a Particle SystemComponent animating many small particles to represent smoke, fire or other effects. , then adjust emission and lifetime. Documentation. Then explore Visual Effect Graph or custom materials with Shader GraphVisual tool for creating shaders by connecting nodes instead of writing all shader code. for URP.
- Animate part of the scenery. Make a door open using Animation and AnimatorComponent controlling animation playback and transitions through an Animator Controller. . For delayed events, explore CoroutineMethod that can pause with yield and resume later, for example after a delay. . Animation, coroutines.
- Display information on screen. Add a UI showing the number of projectiles created. Choose Unity UI or UI Toolkit using the UI systems comparison.
For a later project, you could also import a Humanoid character and animations, study Inverse Kinematics, compare custom controllers based on CharacterController or Rigidbody, or make a car drivable with WheelCollider. These topics need more time: Avatar, IK, vehicles.
To strengthen your scripts, explore RequireComponentC# attribute declaring components a script requires, helping Unity add them when attaching the script. , reference checks and managing subscriptions when a component is disabled or destroyed.
Resources
For understanding and programming:
| Need | Resource |
|---|---|
| Look up an editor concept or setting | Unity 6.3 Manual |
| Understand a C# method’s arguments | Unity 6.3 Scripting API: search for Instantiate, AddForce or GetComponent, for example. |
| Explore actions and bindings | Input System documentation |
| Continue with guided exercises | Unity Learn |
| Find the files used here | Lab resources and first/third person controller |
To enrich the scene: ambientCG for textures and materials, Poly Haven for HDRIs, textures and models, and Mixamo for characters and animations. Before importing an asset, check its usage conditions and, for a Unity package, Unity 6.3 / URP compatibility.
Continue after this lab: A first virtual reality application builds on these foundations to introduce headset tracking, controllers, teleportation and object manipulation with OpenXR and XR Interaction Toolkit.
Troubleshooting
Start with Console: fix the first red error before testing again. Double-click the message to open the relevant line. When asking for help, provide the lab step, the expected result and the exact message.
| Symptom | What to check |
|---|---|
| No Unity autocomplete | Repeat the check at the start of Write RotateCube. Check the external editor and its extensions, then reopen the script from Unity. |
| Script does not compile or cannot be added | Check file and class names, using directives, braces and methods required by interfaces. |
| R does nothing | Click inside Game. Check RotateCube is attached and enabled, its binding is R, and Start() contains both the subscription and Enable(). Also check Active Input Handling = Input System Package (New). |
| No red hover or click response | Check the cube’s collider and MouseInteraction, Physics Raycaster on the active rendering camera, and one EventSystem with Input System UI Input Module. When navigating, set Advanced > Cursor Lock Behavior = Screen Center to aim with the locked cursor. |
| Cube turns red but does not move on click | Use left click. Check the cube’s Rigidbody, Is Kinematic disabled and the active camera’s MainCamera tag. |
| No projectile or missing reference | Check CreateOnClick on the rendering camera, the right-click action and the Projectile Prefab field. The assigned prefab needs a Rigidbody. |
| Player passes through the ground or car | Check their colliders; for the ground, also check its layer and the controller’s ground mask. |
| Pink material or opaque windows | Check the Universal Render Pipeline/Lit shader. For windows, edit the extracted material: Surface Type = Transparent, then reduce Base Map alpha. |
| A change does not propagate to cubes | Check whether you edited the prefab or an instance and whether the instance has an override. |
| Build shows the wrong scene | Check the active profile’s Scene List: UnityBasics must be checked and first. |