Lab — 3D navigation in virtual reality
Compare continuous movement, teleportation, multi-scale navigation and Grabbing-the-Air in a virtual city and maze.

- Goal
- Compare locomotion techniques
- Environment
- Unity 6.3 · XRI 3.3.0
Provided project · VR headset - Prerequisites
- Unity and VR basics
How can you move efficiently through a virtual environment? In this lab, you will test several navigation techniques, tune their parameters and compare their effects on target search, orientation and comfort.
The project provides a city and a small maze containing red buttons called “buzzers”. In the maze, measure the time needed to activate 8 buzzers. In the city, activate as many as possible in 2 minutes.
This lab builds on Unity 3D Basics and A First Virtual Reality Application. The search task is already implemented: your work focuses on locomotion techniques and their evaluation.
Original lab by Cédric Fleury for the RVRA course, RVSI track, FISE, IMT Atlantique, Brest campus. Bilingual web adaptation of the supplied handout and projects.
Lab outline
Resources and starter project
Download both archives for one editor version and extract them into the same parent folder: their contents merge into Navigation3D. The resulting folder must contain Assets, Packages and ProjectSettings, including Assets/VRTemplateAssets. Add this Navigation3D folder to Unity Hub. Keep the two editor versions in separate folders.
| Version | Project and scene | VR template assets |
|---|---|---|
| Unity 6.3 — main route | 6000.3 project | 6000.3 assets |
| Unity 2022.3 — alternative | 2022.3 project | 2022.3 assets |
- Original handout by Cédric Fleury (PDF, in English).
- Original report template (DOCX, in English).
- General lab report guidelines.
The downloads preserve the teaching files from the supplied projects. Builds, caches and local editor files have been omitted; Assets, Packages and ProjectSettings files are retained without modification.
1. Test basic navigation
Open and run the scene
- Open
Assets/Scenes/Navigation.unity. Wait for importing to finish and resolve blocking Console errors before building the application. - For a standalone Android headset, check the Android modules in Unity Hub and the target platform’s XR configuration. In File > Build Profiles (Unity 6) or Build Settings (2022.3), select Android or the appropriate headset profile. Make sure the
Navigationscene is enabled. - If necessary, revisit the deployment steps in the introductory VR lab. Select the headset and choose Build And Run. Android settings apply to standalone builds; PC VR testing in Play requires the appropriate PC configuration and runtime.
- In the headset, locate the score panel, timer, city, maze entrance and maze exit.
Interact and measure
| Initial control | Effect |
|---|---|
| Left thumbstick | Move forward, backward and sideways. |
| Right thumbstick | Turn, in addition to physically rotating your head. |
| Right controller touching a buzzer + index trigger | Activate the target: it turns green. |
- Practise freely to understand the task and controls.
- Maze: activate the buzzer in front of the score panel, find and activate the 8 buzzers in the maze, then record the time when you exit.
- City: start a fresh attempt and record the number of buzzers activated in 2 minutes. Use the panel’s reset control between attempts.
- Record your baseline results in part 1 of the report.
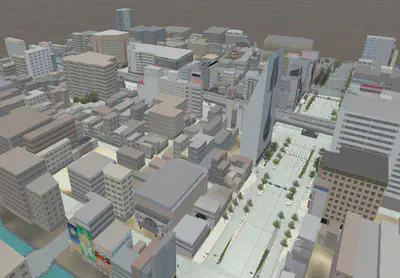
Environments used for the search task. Illustration from Cédric Fleury’s original handout.
2. Configure continuous movement
- In Hierarchy, expand XR Origin, then Locomotion. Find Move and Turn, their providers and their action references.
- Explore the inputs on both components to choose how commands are distributed between the left and right thumbsticks. Change one setting at a time and keep a way to restore the initial configuration.
- Tune translation and turn speeds. Find a compromise between fast movement through streets, precision in corridors and comfort.
- Perform both tasks with the same configuration and parameters in the city and maze.
- In part 2 of the report, record the actions assigned to each thumbstick, the selected speeds, maze completion time and city score. Explain your choices.
Check: movement and turning respond independently; one input should not trigger competing behaviours.
3. Switch between navigation techniques
The supplied NavigationModeManager script on Locomotion lets you switch techniques without rebuilding the application for each trial.
- Inspect its Switch Mode action reference. The handout uses the Y button on the left controller; check the actual binding for your hardware.
- Open the script: it checks the hosting object’s direct children and selects those tagged
NavigationTechnique. At startup, it enables the first one; each press enables the next and disables the others. - Check the tag on Move, then on the techniques you want to include. Keep at least one correctly tagged child. Child order determines cycling order.
- Keep the manager, shared actions and components required by all techniques enabled. Utility objects should not receive this tag.
Check: in Play or in the headset, press Y several times and observe which objects are active. Exactly one technique in the list should be active at a time. Turn can remain shared: check its inputs before reusing the right thumbstick for scaling.
4. Add teleportation
The Teleportation object is already present under Locomotion. You need to associate a selection ray with it and check its connections to teleportable surfaces.
- Find Teleport Interactor under
Assets/Samples/XR Interaction Toolkit/3.1.2/Starter Assets/Prefabs/Interactorsand add it beneath the supplied rig’s left controller. - On XR Ray Interactor, set Interaction Layer Mask to include Teleport. Also check Raycast Mask and the ground colliders. XRI interaction layers and physics layers are separate filters.
- Disable UI Interaction and Manipulate Attach Transform for this exercise. Assign Attach Transform and Ray Origin Transform to the appropriate left-controller transforms.
- Under Input Configuration, assign both Select inputs to XRI Left Locomotion/Teleport Mode, as specified in the handout. Check the references in the project’s input action asset.
- In the Disable Interactor script on
Teleportation, assign the Teleport Interactor GameObject to Associated Interactor. Its active state will then follow the technique’s active state. - Check
Teleportation’sNavigationTechniquetag, its provider and locomotion references. Check that the ground has a teleportation surface compatible with the Teleport interaction layer. - Switch to this mode with Y. Test several ground destinations, then return to continuous movement: the teleportation ray should be disabled.
- Compare ray shapes and their range settings. For a straight ray, inspect Max Raycast Distance; for a curve, inspect its shape-specific parameters. Repeat both tasks with your chosen settings.
Record in part 4: ray shape and range, justification, maze time, city score, and benefits and drawbacks compared with continuous movement.
Reference: XR Ray Interactor — parameters and line types.
5. Add multi-scale navigation
The goal is to change the user’s scale relative to the world to gain different viewpoints and travel greater distances. This control must remain available with continuous movement and teleportation.
- Create a new child under
Locomotionfor scale control. Do not tag itNavigationTechnique: it must remain active when Y switches techniques. - Add the supplied
ContinuousScaleChangeProviderscript and assign its reference to the rig’s Locomotion Mediator. - In Input Actions, look for the scale action described in the handout,
XRI RightHand Locomotion/scale, and check its existence and binding. If it is missing from your archive, create a Value / Vector2 action bound to the right thumbstick and enable its action map through the Input Action Manager. Assign it to Right Hand Scale Action. Avoid simultaneously triggeringTurnwith this input. - Read the script: action properties and thumbstick reading are supplied, but
Update()still contains TODO steps. - Implement input reading, then uniform scaling of the XR Origin Transform. Use elapsed time so the rate is independent of frame rate. Apply strictly positive limits and gradual changes, and check the mediator reference before using it.
- Start with small changes. Observe height, the point about which scaling occurs, interaction reach, apparent speed and collisions.
- Adjust the Teleport Interactor, particularly its range and ray reference frame, to keep destinations usable at different scales. Check the calculated ray and its visible representation separately.
- If possible, add a control that restores the initial scale, then test its usefulness when you lose your bearings.
- Repeat the 2-minute city task with continuous movement + scaling, then teleportation + scaling.
Record in part 5: scores for both combinations, benefits and drawbacks of multi-scale navigation, which technique works best with it, and the usefulness of restoring the initial scale. Describe the adjustments you needed.
6. Test Grabbing-the-Air
This technique lets users move the virtual world through grabbing gestures, in translation and rotation.
- Inspect Grab Move, already present under
Locomotion, and its components’ actions. Check that it is included in the technique list. - Enable this mode with Y and identify the grabbing controls. Test movement with one hand, then two hands; observe movement direction and its effects on orientation.
- Repeat at several scales, then find the 8 maze buzzers. Record the time and difficulties you encounter.
- In the city, combine this technique with scale control and measure the score over 2 minutes.
- To explore movement without being blocked by the ground or buildings, the handout suggests disabling the XR Origin’s CharacterController. Treat this as a separate trial, record the change in your report and re-enable it to restore the previous conditions.
Record in part 6: benefits, drawbacks, precision, physical effort and suitability for multi-scale navigation. Support your answers with situations observed in both environments.
Handout reference: Grabbing-the-Air — HCI Museum.
7. Bonus: World-in-Miniature with teleportation
Create a miniature representation of the city to help locate buzzers and select a distant destination.
- Display a miniature world, separate from the full-size environment. Avoid duplicating the score logic, rig or main-scene interactions inside it.
- Allow users to point at a location in the miniature with a virtual ray.
- Convert the selected point from the miniature’s coordinate system to the world’s coordinate system, then move the rig to a valid destination. Account for the miniature’s translation, rotation and scale.
- Check that the destination is accessible and that the miniature remains usable after travelling.
- Compare this search aid with multi-scale navigation: target discovery, orientation and destination precision.
Sources from the handout: Stoakley, Conway and Pausch, Virtual Reality on a WIM, 1995, video demonstration and UnityWorldInMiniature example.
Report and discussion
Complete the original report template. Its questions are also covered throughout this page. Use the table below to gather results; include units, parameters and the number of attempts.
| Condition | Maze: time for 8 buzzers | City: buzzers in 2 min | Settings and observations |
|---|---|---|---|
| Initial navigation | Measure | Measure | Supplied configuration |
| Configured continuous movement | Measure | Measure | Same parameters in both environments |
| Teleportation | Measure | Measure | Ray shape and range |
| Continuous + multi-scale | — | Measure | Scale limits and control |
| Teleportation + multi-scale | — | Measure | Ray adjustments |
| Grabbing-the-Air | Measure | Measure with multi-scale | One/two hands, collisions |
Conclude by relating performance to each environment’s characteristics. Which technique would you choose for searching the city? For travelling through a narrow space? Discuss the trade-off between efficiency, orientation and comfort, and the limitations of your trials.
Troubleshooting and reminders
| Problem | Checks |
|---|---|
| Camera stays still in the headset | Disable the simulator before building; check XR tracking and the target platform’s provider. |
| Y does not switch techniques | Active Switch Mode action, controller binding, direct children tagged NavigationTechnique, non-empty list. |
| Ray visible but teleportation fails | XRI Teleport layer, physics mask, ground collider and surface, Select actions, provider and mediator. |
| Ray appears in every mode | Associated Interactor reference and activation of Teleportation by the manager. |
| Scaling has no effect or throws an exception | Completed script, assigned mediator, active Vector2 action, correct XR Origin target. |
| Turning and scaling happen together | Right-thumbstick actions shared by Turn and the scale provider. |
| Changes do not appear in the headset | Save the scene, rebuild and install the correct scene from the correct project copy. |
The supplied XR Interaction Simulator lets you check logic in the editor: enable it for testing without a headset and consult its control overlay. Disable it before headset trials and builds. Performance, perceived scale and comfort must be evaluated in the headset. Take breaks and stop a trial if you feel discomfort.
Documentation: XRI 3.3 locomotion for the Unity 6 project; XRI 3.1 manual for the 2022.3 alternative.
Credits: original handout, search task and starter projects by Cédric Fleury, RVRA course, RVSI track, FISE, IMT Atlantique — Brest campus. Script and action names are preserved to make it easy to connect this page to the original resources.