Lab — 3D interaction: manipulation techniques
Direct grabbing, virtual rays, Near Far and two-handed manipulation: design and compare interaction techniques in virtual reality.

- Experimental task
- Build a tower · 2 min per trial
- Provided project
- Unity 6.3 · XRI 3.3.0
OpenXR 1.16.0 - Prerequisites
- Unity and VR basics · Headset and controllers
You will compare manipulation techniques using a common task: build a tower of blue and yellow blocks in two minutes. The aim is to understand how selection, attachment points and distant interaction affect precision, speed and effort.
This lab follows the Unity and VR introductions. The task scene and scripts are provided: your work focuses on configuring and evaluating interactions.
IMT Atlantique · Brest Original lab by Cédric Fleury, for the RVRA course, RVSI track of the FISE programme.
Lab outline
The task: a two-coloured tower
The blue generator on the left produces blue blocks; the yellow generator on the right produces yellow blocks. Move them to the central platform to build your tower.
- Each level contains two blocks of the same colour.
- The blocks in each level are perpendicular to those in the previous level.
- Colours alternate between levels: blue, yellow, blue…
- Each trial lasts 2 minutes. At the end, count the complete levels still standing that meet these rules.
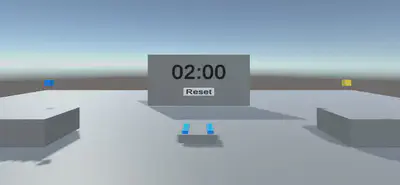
Scene from Cédric Fleury’s original lab. The handout mentions a record of 19 levels after two attempts: a historical reference, without a required target for this session.
1. Explore the project and basic interactions
Open the appropriate version
- Download the Unity 6.3 project, extract it and add the
Interaction3Dfolder through Unity Hub > Add project from disk. Select the folder containingAssets,PackagesandProjectSettings. - The project was saved with 6000.3.1f1. Use the version assigned for your session and keep a copy before converting it. Wait for package resolution and check Console for errors.
- Open
Assets/Scenes/Interaction.unity. Locate both generators, the platform, timer and controllers. - For a standalone Quest, check Unity’s Android modules, File > Build Profiles, the Android/Meta Quest platform, build scene and XR settings. If needed, follow the deployment section of the VR introduction. Use Build And Run with a headset prepared for development.
Try the task
The controls below follow the supplied handout for Touch controllers. Check the project’s bindings if you use other hardware.
| Control | Action |
|---|---|
| Left thumbstick | Move through the scene. |
| X button | Switch navigation mode, including teleportation. |
| Right controller contact + index trigger | Grab a block or select a generator / Reset button. |
| Right B / left Y button | Switch the technique on the corresponding hand once several modes are configured. |
- Try continuous movement and teleportation. Find a position from which you can reach the generators and tower.
- Generate a few blocks, grab and rotate them, then release them on the platform.
- Reset the scene and complete a first timed trial. The supplied script starts the timer when the first block is generated after a reset.
- Record your first score, then your best score after a few attempts. Use the same number of trials when comparing configurations.
Record — report part 1: both scores, your preferred navigation mode and why it suits this task.
2. Set up technique switching on each controller
The Controller Manager component (ControllerManager.cs) lets you switch interactors at runtime without rebuilding the application for each comparison.
- Select the right controller, then the left, and locate Controller Manager and its Switch Mode action.
- Each mode must be a direct child of its controller and have the ControllerMode tag. Use the existing Direct Interactor as an example.
- Add subsequent modes as siblings of the Direct Interactor, in the order you want to test them. A tagged mode root can contain several components or child objects.
- At startup, the script collects these children, disables the modes and enables the first one. B or Y cycles to the next while disabling the others. With only one mode, pressing the button makes no visible change.
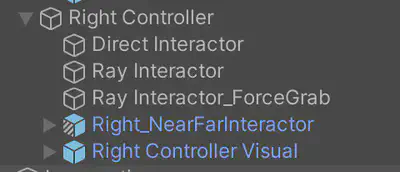
Hierarchy example from the original handout. Object names may vary slightly.
Check: after adding a second mode, confirm in Play that only one mode root is active on each hand. Release held objects before switching. Tag the direct child: the script does not search grandchildren when building its mode list.
3. Change the blocks’ manipulation point
The initial grab brings a block towards its configured attachment point. Compare this with a grab that preserves the contact point.
- Duplicate both generators. Make the new versions visually distinguishable while retaining a blue family and a yellow family.
- In
Assets/Prefabs, duplicate Blue_cube and Yellow_cube. Name the copies, for example,Blue_cube_DynamicandYellow_cube_Dynamic. - On each copy, enable Use Dynamic Attach in XR Grab Interactable. Explore Match Position, Match Rotation and Snap To Collider Volume. Change one setting at a time.
- In each new generator’s Generate Cube component, assign the corresponding prefab to Cube. Keep the timer reference.
- Grab blocks near their centre and near an end. Compare positioning and orientation with the original blocks, then repeat the task.
Record — part 3: benefits and limitations of Dynamic Attach when grabbing, rotating and placing blocks. Use concrete observations.
Reference: XR Grab Interactable — Unity documentation.
4. Add a virtual ray
Configure distant selection
- Add an XR Ray Interactor as a child of the right controller: right-click in Hierarchy, XR > Ray Interactor. Name the mode
Rayand tag its root ControllerMode. - In Interaction Layer Mask, allow the blocks’ and generators’ layers, but exclude the layer reserved for teleportation (
TeleportorTeleport Layer, depending on the project). - Under Input Configuration, configure Select Input for the right trigger, reusing the action reference from the supplied Direct Interactor. Do not assume Select uses the same button as in the previous lab.
- Disable UI Interaction for this activity. Check the ray’s origin, direction and line components.
- Run the application, switch to Ray with B, and test distant generation and grabbing.
Check: the ray selects blocks and generators without triggering teleportation. A target must share an XRI interaction layer with the interactor and be detected by its physics raycast: Interaction Layer Mask and Raycast Mask are separate filters.
Compare variants
Duplicate the Ray mode under the same controller and name each variant clearly. Keep the inputs and filters unchanged so that only the option under study differs.
| Variant | Setting to compare | Expected observation |
|---|---|---|
| Basic ray | Force Grab disabled | Manipulate the block at a distance. |
| Ray with retrieval | Force Grab enabled | The selected block comes to the hand. |
| Adjustable attachment | Manipulate Attach Transform enabled | Move the attachment using the thumbstick; check translation/rotation inputs. |
Repeat a trial with each variant. Examine generator access, transport to the centre, block rotation and release accuracy. If the thumbstick controls several actions, inspect their bindings and possible conflicts with locomotion.
Record — part 4: benefits of the ray over direct grabbing, benefits of direct grabbing, advantages and drawbacks of Force Grab, usefulness of Manipulate Attach Transform, preferred configuration and best score.
Reference: XR Ray Interactor — Unity documentation.
5. Test Near Far
- Find Right_NearFarInteractor in
Assets/Samples/XR Interaction Toolkit/3.1.2/Starter Assets/Prefabs/Interactors. Add it under the right controller as a new mode. - Tag its root ControllerMode. Check right-hand references, Select inputs and interaction filters, as you did for the ray. Disable UI interaction to keep conditions consistent.
- Select a nearby block, then a distant one. Observe how the technique combines near and distant interaction.
- Compare Far Attach Mode = Near and Far: in the XRI 3.3 documentation, this setting controls retrieval to the hand or manipulation at a distance. The original handout calls this “Force Grab”; locate the corresponding setting in your installed component.
- Complete the task with both variants. Create two modes if you want to compare them using B without rebuilding.
Record — part 5: the technique covered in class that is most similar, benefits and drawbacks for this task, and any difficulties when transitioning between near and far interaction. Support your answer with observations.
Reference: Near-Far Interactor — Unity documentation.
6. Use both hands
- Add manipulation modes to the left controller too. Use Left_NearFarInteractor for Near Far, or adapt a ray’s inputs and handedness to the left hand.
- Check tags and actions. Y switches the left mode and B the right; do not leave right-hand actions assigned to both hands.
- Try a symmetric combination, then assign different roles to the hands: for example, retrieve blocks with one and position them with the other.
- Compare these combinations with your best one-handed configuration using the same rules and duration.
The goal is to manipulate two blocks or distribute actions between hands. You do not need to enable simultaneous selection of the same block by both controllers.
Record — part 6: benefits of two techniques, most efficient combination, justification and best number of levels.
Compare results and write your report
Use the original report template in English and the questions on this page. See also the general report guidelines. Question numbering follows the handout: part 2 prepares the interactions and has no separate section in the template.
For each configuration, record the settings you actually tested:
| Configuration | Left / right hand | Grab point | Options | Trial 1 | Best score | Observations |
|---|---|---|---|---|---|---|
| Initial direct | Specify | Initial | Navigation mode | … | … | … |
| Dynamic direct | Specify | Dynamic | Attachment settings | … | … | … |
| Ray | Specify | Specify | Force Grab / attachment | … | … | … |
| Near Far | Specify | Specify | Far Attach Mode | … | … | … |
| Two hands | Specify | Specify | Chosen combination | … | … | … |
Allow comparable short practice periods, reset between trials and record the number of repetitions. Separate measured performance from subjective experience: a technique can be fast while requiring more effort. Learning may improve scores throughout the session; a single best trial does not establish that one technique is generally superior.
Before finishing: save the scene, modified prefabs and Packages files. Your application should switch modes without rebuilding, generate both colours, reset the task and support one-handed and two-handed trials.
Troubleshooting
| Symptom | Check |
|---|---|
| B / Y does nothing | Multiple direct children tagged ControllerMode, Switch Mode action and hierarchy order. |
| The ray is visible but cannot grab | Select Input, colliders, Interaction Layer Mask, Raycast Mask and the target’s interactable component. |
| The ray triggers teleportation | Exclude its layer from manipulation modes and check shared inputs. |
| A new generator produces the original blocks | The Generate Cube component’s Cube field and the prefab you actually edited. |
| Near Far uses the wrong hand | Left/right prefab, Handedness and action references. |
| Generation stops after time runs out | Use Reset before starting again: the supplied timer requires a reset. |
| The headset does not launch the scene | Build scene, platform, XR provider and connection; revisit the VR introduction. |
Author and original resources
Original lab designed by Cédric Fleury for the RVRA course, RVSI track of the FISE programme at IMT Atlantique, Brest campus. Contact listed in the handout: cedric.fleury@imt-atlantique.fr.
This page provides a French and English web adaptation of the supplied handout and resources for the 2025–2026 academic year. The task and controller illustrations come from the original handout.
- Original handout — English PDF.
- Original report template — English DOCX.
- Unity 6.3 project: project files retained; precompiled APK and macOS metadata removed to reduce the download size.
- Original Unity 2022.3 project.